
Design Tool Tips - Accent Marks and Special Characters
ACCENT MARKS AND SPECIAL CHARACTERS
— Entering Accented & Special Characters —
On occasion you may find it necessary to enter text into your online design that uses one or more accented characters (such as the acute over the two "e" letters in "résumé"), or requires using certain special characters (such as the inverted question mark when asking "What?" in Spanish: «Qué» ). Our current Online Design Tool (ODT) accepts entry of both Accented and Special Characters. These characters may be entered manually using the keyboard or by using copy-&-paste. Please note that fonts may have different character sets, meaning that some special characters may not be present or may differ in those fonts. Exactly how to enter Accented and Special Characters will vary by the computer operating system in use (Windows, OSX, Chrome OS, etc.).
Copy-&-Paste:
If using existing text from some other source which includes non-standard characters, using the copy-&-paste may well be the easiest. This method has the benefit of being virtually universal across computer systems. For those who may be unfamiliar with this method, here is a brief 'how to':
- Windows:
- To select text, click and drag the cursor until the text you want to copy is highlighted, then release the mouse button. An example would be to select this: «Qué»
.png)
- Right-click the mouse or trackpad, and select Copy from the context menu. The selected text will be copied to the Clipboard (which uses the computer's memory as temporary storage) on your computer.
.png)
- If using a trackpad, depending on your computer's settings you can perform a right-click by either using two fingers to click the trackpad or by tapping the far-right side of the trackpad with a single finger.
- Or... If available in the program's menu bar, select Edit, and then select Copy.

- Or... You may also use the keyboard shortcut CTRL+C (for the Copy command).
- Right-click in the ODT's Text Editor field. Click Paste. The text will be inserted into the field at the place where you put the cursor. You may also use the keyboard shortcut CTRL+V (for the Paste command). As in Step 3, you can also click Edit in the menu bar, then click Paste.
- To select text, click and drag the cursor until the text you want to copy is highlighted, then release the mouse button. An example would be to select this: «Qué»
- OSX / Mac:
- To select text, click and drag the cursor until the text you want to copy is highlighted, then release the mouse button. An example would be to select this: «Qué»
- Right-click on the mouse or trackpad. If using a trackpad, depending on your computer's settings you can perform a right-click by either using two fingers to click the trackpad or by tapping the far-right side of the trackpad with a single finger.
- If available, select Edit, and then select Copy. The selected text will be copied to the Clipboard (a type of temporary storage) on your computer. You may also use the keyboard shortcut ?+C (Command+C), or right-click on the mouse or trackpad and then click Copy.
- If using a Mac without the right-click function, use the Control+Click combination to open the context menu, then select Copy.
- Right-click in the ODT's Text Editor field. Click Paste. The text will be inserted into the field at the place where you put the cursor. You may also use the keyboard shortcut ?+V (Command+V), or right-click on the mouse or trackpad and then click Paste.
- If using a Mac without the right-click function, use the Control+Click combination to open the context menu, then select Paste.
- If using a Mac without the right-click function, use the Control+Click combination to open the context menu, then select Paste.
- ChromeOS:
ChromeOS users may not have a right-click menu available.- To select text, click and drag the cursor until the text you want to copy is highlighted, then release the mouse button. An example would be to select this: «Qué»
- If available, select Edit, and then select Copy. The selected text will be copied to the Clipboard (which uses the computer's memory as temporary storage) on your computer. You may also use the keyboard shortcut CTRL+C (for the Copy command). Many programs/applications include an Edit option in their menu bars. That menu will include the click Copy command.
- Left-click the ODT's Text field to place the cursor in it. If available, select Edit, and then select Paste. The text will be inserted into the field at the place where you put the cursor. You may also use the keyboard shortcut CTRL+V (for the Paste command).
 |
Character Map (Windows): At times the need for an Accented or Special Character will be for just that: a single character (such as the Copyright symbol — © — or an "acute e" — é). One fairly easy method for this on Windows computers will be the Character Map. This utility program displays the fonts which are included in each installed font, and the ALT codes for those characters (when available). It also makes it possible to use Copy-&-Paste with a selected character (or set of characters). While there have been some changes to it over the years, the Character Map has been a part of Windows since at least Windows 3.11/Windows NT 3.51. Launching the Character map can be accomplished in several ways but for ease of use we'll use the method that is virtually identical in all versions of Windows.
|
This article uses a simple format when listing the steps to perform. For example, these steps — START > RUN > charmap > ENTER — will launch the Character Map in any version of Windows (Windows 8 users find this to be START > Search > Apps > Run > charmap > ENTER). For those unfamiliar with that format, the way it can be read is:
START (Press the Windows key on the keyboard, or click START on the taskbar.)
> (Then...)
RUN (Enter or Select "Run".)
> (Then...)
charmap (Enter charmap into the Run box.)
> (Then...)
ENTER (Press the Enter (or Return) key to execute the command and launch the Character Map.)
> (Then...)
RUN (Enter or Select "Run".)
> (Then...)
charmap (Enter charmap into the Run box.)
> (Then...)
ENTER (Press the Enter (or Return) key to execute the command and launch the Character Map.)
The Character Map gives us two methods of getting an Accented or Special Character into the ODT's Text Editor. When using either or both methods please check the results in the ODT to make sure the desired character is present. If you see a placeholder box, an empty space, or some other indication that the character isn't there it will mean that the specific character we're trying to use is not included in the selected ODT font.
 |
As an example, we'll enter this text into the ODT's Text Editor: 12"×18" We can enter all of that direct except for the Multiplication Sign. As there are a lot of fonts installed on today's computers right out of the box, and we already know which symbol we're looking for, we'll find it in the Character Map the easy way; using the Character Map's Search For feature. To do that, select Advanced View and locate the Search For field at the bottom of the window. While we could enter the complete name of the symbol, we don't always have to do that. In this case I've entered the first five letters of the word multiplication and pressed ENTER. The result shows the symbol we're looking for without our having to scroll through every available character. |
| To add the × symbol to the ODT, we can use Character Map's Select button to place the symbol into the Characters to Copy field, and then use the Copy button to put the symbol into the Clipboard. We can then Paste the symbol into the Text Editor. If using a computer with a keyboard which includes the number pad, we could also add the symbol to the ODT by using the character's ALT code (which we go into more detail about later in this article). The ALT code for the × symbol is: ALT+0215. To use the ALT code, we place our cursor where we want to place the character, press-&-hold one of the ALT keys, and then use the number pad to enter the digits 0215, and then release the ALT key. The example images below show the same 18"×24" text. First, using the Franklin font on the left. Second, after changing the selected font to Frizt Quadrata. The second font does not include the Multiplication Sign, which is why instead we have a space where the symbol should be shown. |
|
.png)  |
|
Accented Characters (Mac OSX):
Persons using OSX (the operating system on today's Macintosh computers) have an easy way to enter lowercase and uppercase Accented Characters. As with other methods of adding such characters directly into the ODT's Text Editor, please double-check the results before ordering. These accented characters may not be available in all of the ODT's fonts. Accented letter versions may not be available for every character in the fonts used in OSX.
|
Lowercase: To enter a lowercase accented character, press and hold the appropriate letter key on the keyboard until a menu like the one shown a right appears. If no menu appears, no accented options are available for that character. The example image here shows the options available for the lowercase "e". To select one of the accented options, press the key for the number shown below the desired character. To select the 'acute e' (é), a user would enter the number two [2].
|
 |
 |
Uppercase: To enter an uppercase accented character, press and hold a SHIFT key along with the appropriate letter key on the keyboard until a menu like the one shown at left appears. If no menu appears, no accented options are available for that character. The example image here shows the options available for the uppercase "E". To select one of the accented options, press the key for the number shown below the desired character. To select the 'acute e' (É), a user would enter the number two [2]
|
Character View (Mac OSX):
As discussed in the section about the Windows Character Map, a single Accented or Special Character may be needed (such as the Copyright symbol — © — or an inverted exclamation point — ¡). One fairly easy method for this on Macintosh computers will be the Character Viewer. This utility program displays a number of categories and subcategories of special characters included in OSX.
While there are several ways to bring up the Character Viewer, one of the easiest is this keyboard shortcut: CONTROL+COMMAND+SPACE BAR – or – CTRL+?+SPACE BAR
This command format should be read as: Press and hold the CONTROL key, the COMMAND key, and the SPACE BAR, then release all three at the same time.
This command format should be read as: Press and hold the CONTROL key, the COMMAND key, and the SPACE BAR, then release all three at the same time.
 |
To add the selected character to the ODT's Text Editor, double-click that character in the Character Viewer. Continuing with the first example mentioned earlier, the copyright symbol: 1 - Left click in the Text Editor's field to place a typing cursor there. 2 - CTRL+COMMAND+SPACE BAR to launch the Character Viewer. 3 - Select Letterlike Symbols. 4 - Locate and double-click the © symbol. You should see that symbol in the ODT's text field now. As with any other method used to directly enter Special or Accented Characters into the ODT, please double-check the text before ordering. Fonts available in the ODT may not include all of the characters or symbols shown in the Character Viewer. If one or more desired characters aren't available using the Character Viewer, it may be necessary to use one of the alternative methods described later in this article. |
 |
The Character Viewer includes multiple categories and subcategories. Some will work with the ODT's Text Editor, and some will not. In order from top-to-bottom, these are:
- Emoji — Not accepted
- Smileys & People
- Animals & Nature
- Food & Drink
- Activity
- Travel & Places
- Objects
- Symbols
- Flags
- Arrows — May be accepted, depending upon which characters are available in the selected ODT font.
- Bullets/Stars — May be accepted.
- Currency Symbols — May be accepted.
- Latin — May be accepted.
- Letterlike Symbols — May be accepted.
- Math Symbols — May be accepted.
- Parenthesis — May be accepted.
- Pictographs — Not accepted.
- Punctuation — May be accepted.
Unicode Characters (Chrome OS):
Chromebook users quickly discover that the Chrome OS does not yet include a utility equivalent to the Character Map in Windows, or the Character Viewer in OSX, but this does not mean that entering Accented or Special Characters is impossible. The method used is:
CONTROL+SHIFT+U Followed by a four-character hexadecimal code.
To enter the copyright (©) symbol in Chrome OS for example, can be done as follows:
- Press CONTROL+SHIFT+U in order, then release them together.

- After a symbol like an underline "u" appears, type 00A9 and press ENTER.
.png)
.png)
- To finish, click the Add Text button to place the into the design.

A few symbols that may be useful when working with certain types of text in the Online Design Tool (ODT) are featured below. Since any given symbol or special character may not be supported by the fonts in the ODT, please double check any text in your design before ordering.
| Character | Code | Description | Character | Code | Description |
| ¡ | 00A1 | Inverted exclamation point | » | 00BB | Right double angle quote |
| ¢ | 00A2 | Cent sign | ¿ | 00BF | Inverted question mark |
| © | 00A9 | Copyright symbol | × | 00D7 | Multiplication symbol |
| « | 00AB | Left double angle quote | ÷ | 00F7 | Division symbol |
| ® | 00AE | Registered symbol | • | 2022 | Bullet |
| ° | 00B0 | Degree symbol | ™ | 2122 | Trademark symbol |
The commonly (and some less commonly) used accented characters in both upper and lower case. Since any given symbol or special character may not be supported by the fonts in the ODT, please double check any text in your design before ordering.
| Character | Code | Description | Character | Code | Description |
| À | 00C0 | Grave capital letter A | à | 00E0 | Grave small letter A |
| Á | 00C1 | Acute capital letter A | á | 00E1 | Acute small letter A |
| Â | 00C2 | Circumflex capital letter A | â | 00E2 | Circumflex small letter A |
| Ã | 00C3 | Tilde capital letter A | ã | 00E3 | Tilde small letter A |
| Ä | 00C4 | Diaeresis capital letter A | ä | 00E4 | Diaeresis small letter A |
| Å | 00C5 | Ring above capital letter A | å | 00E5 | Ring above small letter A |
| Æ | 00C6 | Capital letter Æ | æ | 00E6 | Small letter æ |
| Ç | 00C7 | Cedilla capital letter C | ç | 00E7 | Cedilla small letter C |
| È | 00C8 | Grave capital letter E | è | 00E8 | Grave small letter E |
| É | 00C9 | Acute capital letter E | é | 00E9 | Acute small letter E |
| Ê | 00CA | Circumflex capital letter E | ê | 00EA | Circumflex small letter E |
| Ë | 00CB | Diaeresis capital letter E | ë | 00EB | Diaeresis small letter E |
| Ì | 00CC | Grave capital letter I | ì | 00EC | Grave small letter I |
| Í | 00CD | Acute capital letter I | í | 00ED | Acute small letter I |
| Î | 00CE | Circumflex capital letter I | î | 00EE | Circumflex small letter I |
| Ï | 00CF | Diaeresis capital letter I | ï | 00EF | Diaeresis small letter I |
| Ð | 00D0 | Capital letter Eth | ð | 00F0 | Small letter Eth |
| Ñ | 00D1 | Tilde capital letter N | ñ | 00F1 | Tilde small letter N |
| Ò | 00D2 | Grave capital letter O | ò | 00F2 | Grave small letter O |
| Ó | 00D3 | Acute capital letter O | ó | 00F3 | Acute small letter O |
| Ô | 00D4 | Circumflex capital letter O | ô | 00F4 | Circumflex small letter O |
| Õ | 00D5 | Tilde capital letter O | õ | 00F5 | Tilde small letter O |
| Ö | 00D6 | Diaeresis capital letter O | ö | 00F6 | Diaeresis small letter O |
| Ø | 00D8 | Capital letter O with stroke | ø | 00F8 | Small letter O with stroke |
| Ù | 00D9 | Grave capital letter U | ù | 00F9 | Grave small letter U |
| Ú | 00DA | Acute capital letter U | ú | 00FA | Acute small letter U |
| Û | 00DB | Circumflex capital letter U | û | 00FB | Circumflex small letter U |
| Ü | 00DC | Diaeresis capital letter U | ü | 00FC | Diaeresis small letter U |
| Ý | 00DD | Acute capital letter Y | ý | 00FD | Acute small letter Y |
| Þ | 00DE | Capital letter Thorn | þ | 00FE | Small letter Thorn |
| ß | 00DF | Sharp small letter S | ÿ | 00FF | Diaeresis small letter Y |
Reference sources for unicode characters include the Unicode Character Table site, the Character Code Charts section on Unicode.org, and the Wikipedia List of Unicode Characters.
— Text As Graphic —
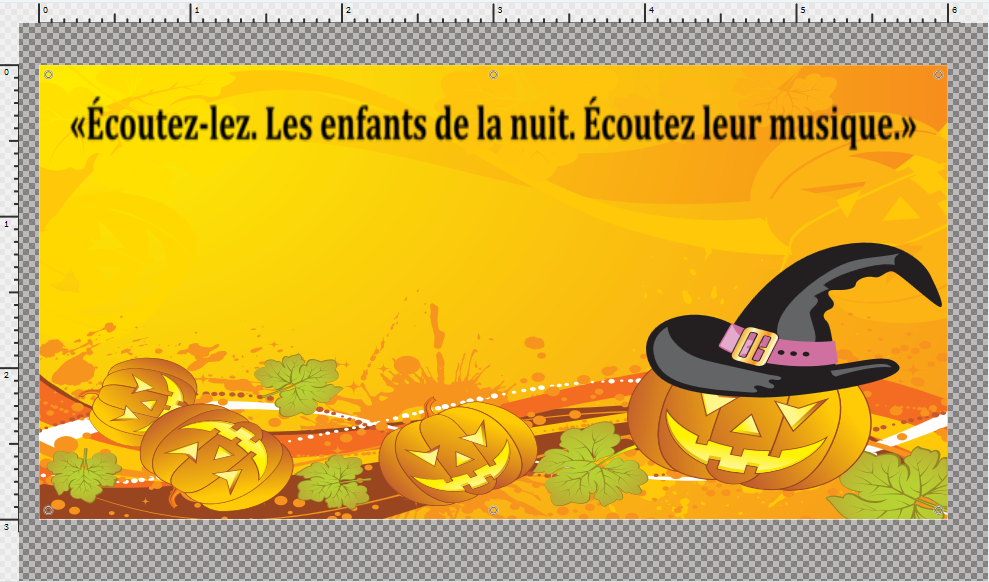
One method of adding text with accented or special characters to an online design that is – in a way – fairly easy to do is to use a graphics program on your computer (such as Microsoft Paint® in Windows®). As this is being written on Halloween, I'll use the French version of a quote from the 1931 film Dracula:
«Écoutez-lez. Les enfants de la nuit. Écoutez leur musique.»
"Listen to them. Children of the night. What music they make."
 |
Most of this text will be plain simple letters. There are three specific special characters in this quote; the opening [«] and closing [»] French quotation marks, and the acute capital letter e [É]. Using Photoshop®, I've created a new image using these settings:
• Height = 6"
• Width = 84"
• Colors = RGB
• Background = Transparent
|
The large size of the image is intentional. Creating a large image helps preserve its appearance if I have to enlarge it after importing it into the online design tool, as it should mean that I will only have to enlarge it slightly, if at all.
If I have to make the image smaller once it is in the online design tool, its appearance will be preserved as well.
In Photoshop® and other programs, one of the most common ways to enter accented and special characters is the Character Map (Windows) or the Character Viewer (Macintosh). Another very common method is the use of keyboard shortcuts. Written forms of such shortcuts can be thought of as a form of shorthand, such as:
In Windows, the capital letter E with the acute accent = ALT+0201 = É — Meaning press and hold one of the ALT keys and then press the number keys on the keypad 0, 2, 0, 1, then release the ALT key. If you're working on a computer that does not have the set of number keys on the right side–that looks like a calculator keypad–you'll not be able to use keyboard shortcuts, and will have to use the Character Map.
On a Macintosh, the capital letter E with the acute accent = OPTION+E, E = É — Meaning press and hold the OPTION key and then press the E key, the comma means 'release both keys' and then press the letter E key again.
For the three special characters in this example, the keyboard shortcuts are:
| Special Character |
Windows Shortcut |
Mac OSX Shortcut |
Chrome OS Shortcut |
| É | ALT+0201 | OPTION+E, E | CTRL+SHIFT+U, 00C9 |
| « | ALT+0171 | OPTION+\ | CTRL+SHIFT+U, 00AB |
| » | ALT+0187 | SHIFT+OPTION+\ | CTRL+SHIFT+U, 00BB |
The exact font settings may require some experimentation, based on the font being used. In this example, I've used the Cambria font in black, with a manually-entered point size of 225:
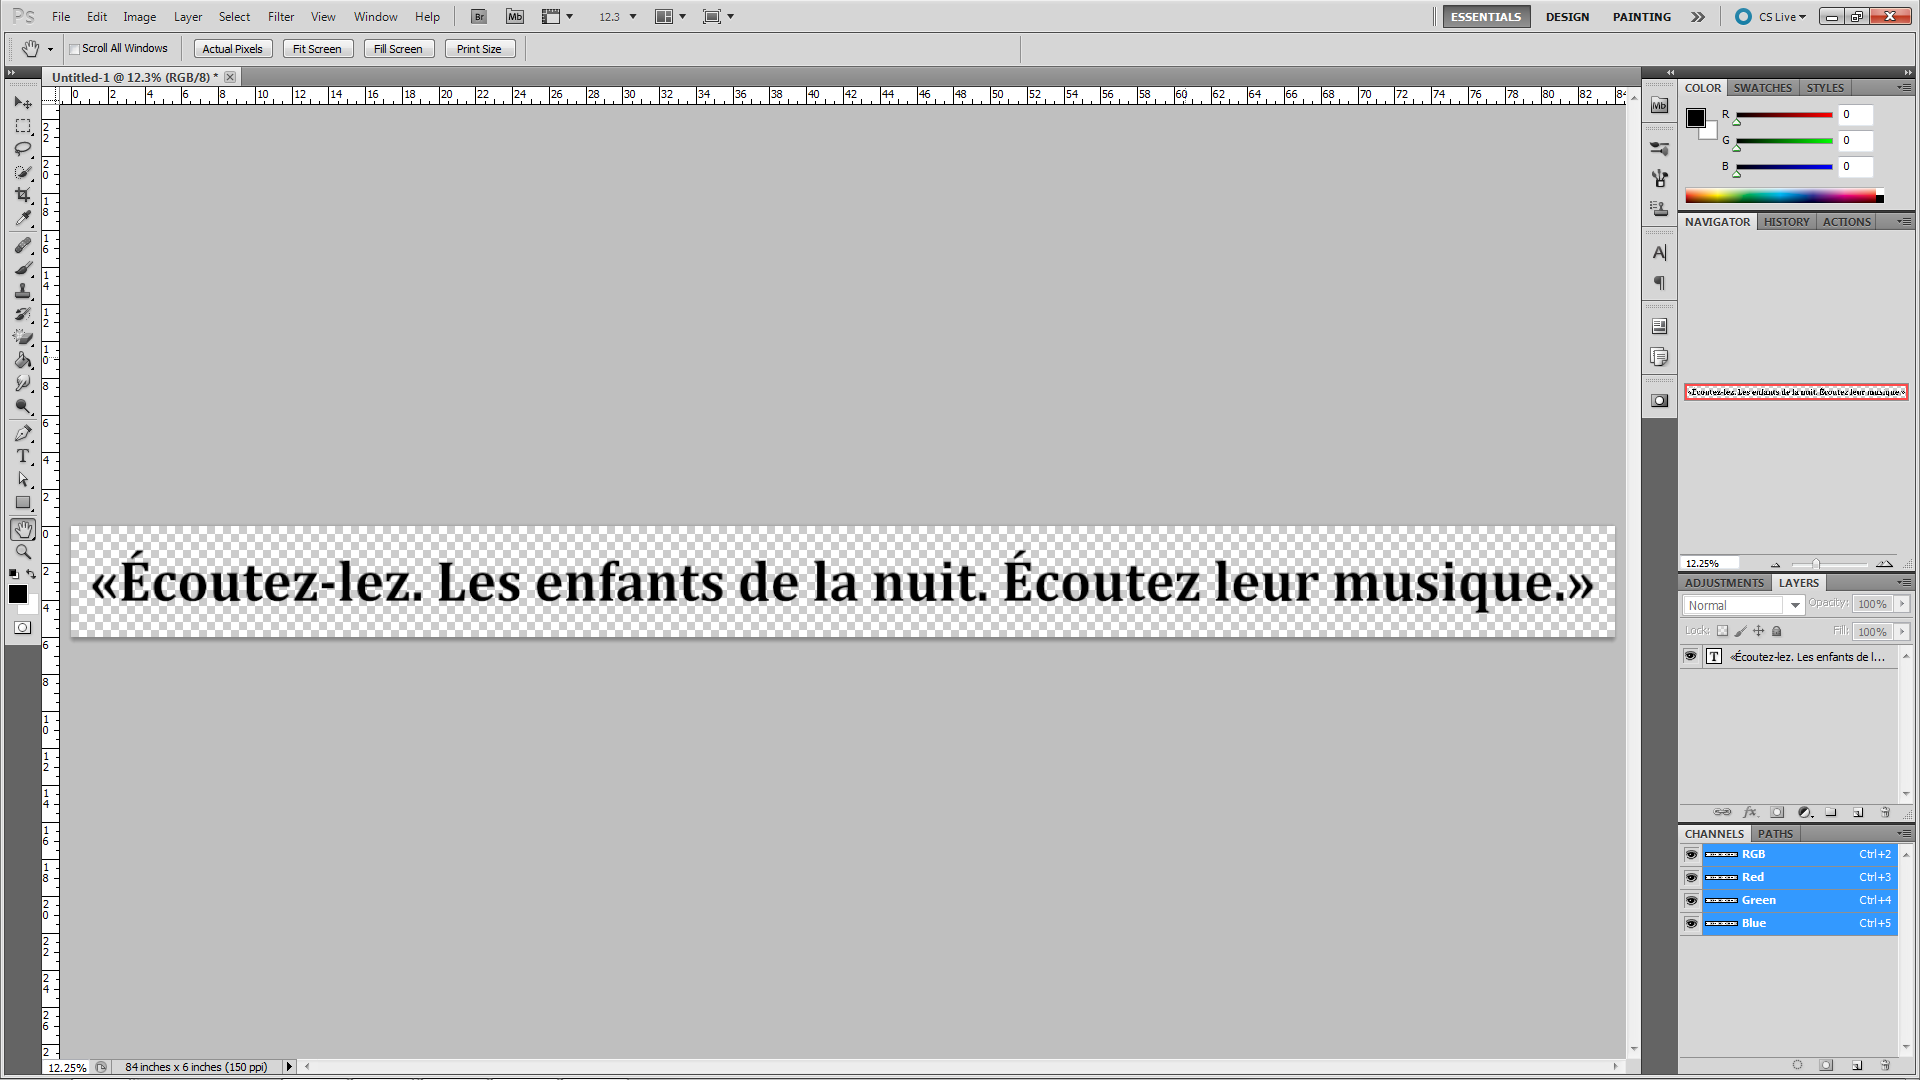
When saving the image, I'll be using the PNG format. The PNG format is one that works well with the online design tool, it also retains the transparent background. Once the image has been saved, it may be imported into the online design tool. The transparent background avoids the potential problem of having to change the background color several times.
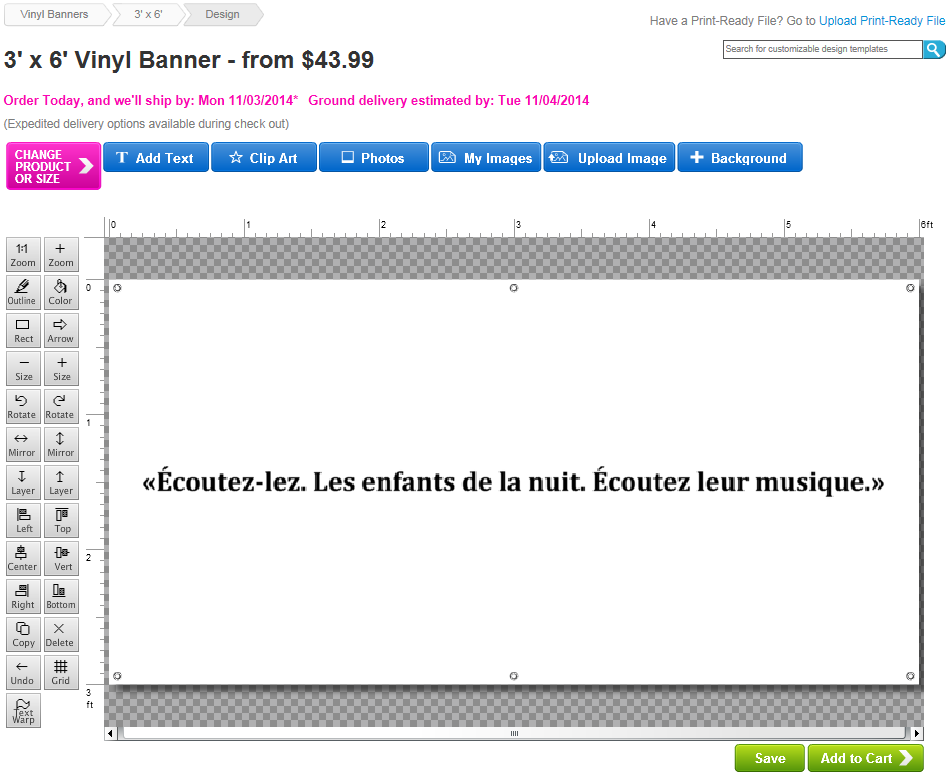
Please Note that imported images, such as the graphics version of the line of text discussed here may not appear at their full resolution in the online tool, but will be used at their full resolution by Production.
— Design Tool Tricks —
Special Characters in Clipart:
Certain special characters already exist in the eSigns online design tool, and may be found by going to Insert Image, Clip Art, and then clicking Symbols & Icons in the By Subject list. In the image at left I've scrolled through the list of images so that the "Registered" ® mark may be seen. This mark is one of the special characters that cannot be entered directly into the online tool using a keyboard shortcut.
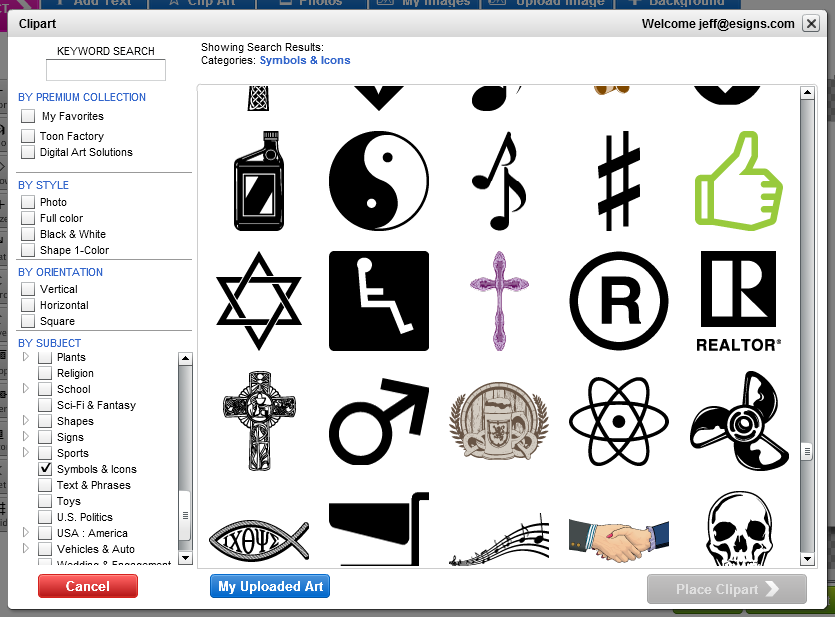
A brief list of characters that may be found in the clip art includes (without being limited to):
| Dollar Sign - $ - outline | Copyright Symbol - © - solid |
| Dollar Sign - $ - solid | Registered Symbol - ® - solid |
| Cent Sign - ¢ - solid | Venus (Female) - ? - solid |
| Cent Sign - ¢ - outline | Mars (Male) - ? - solid |
To demonstrate creating a special character in the online design tool, we'll try entering the value of 5,000,000 (5 million) in scientific notation: 5×10?
When pasted into the text editor, the special character ? will appear to be included, but is lost when that text is add, as shown in the images below:
.png) |
 |
The missing "6" can be added into the design quite easily. To begin, double-click the text in the ODT to open it in the Text Editor and delete the ?. Then use the Update Text button to complete the change. Next, select Add Text and enter a normal number six [6], moving to a different part of the design as needed to make it easier to work with.
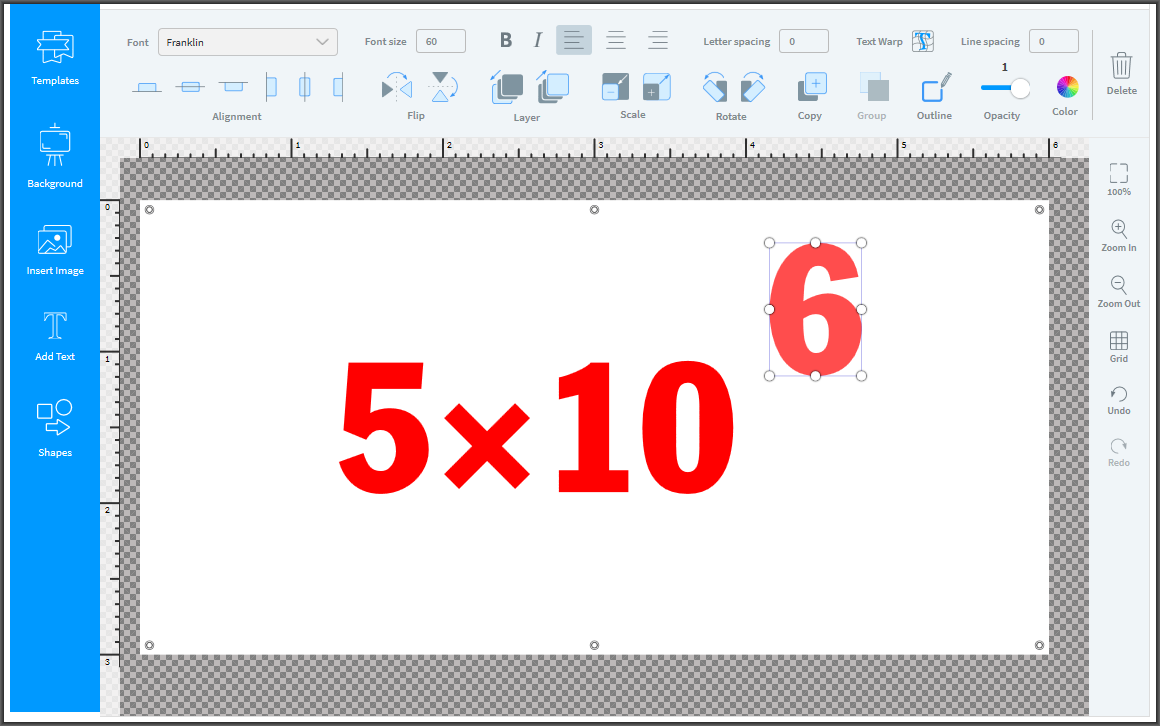
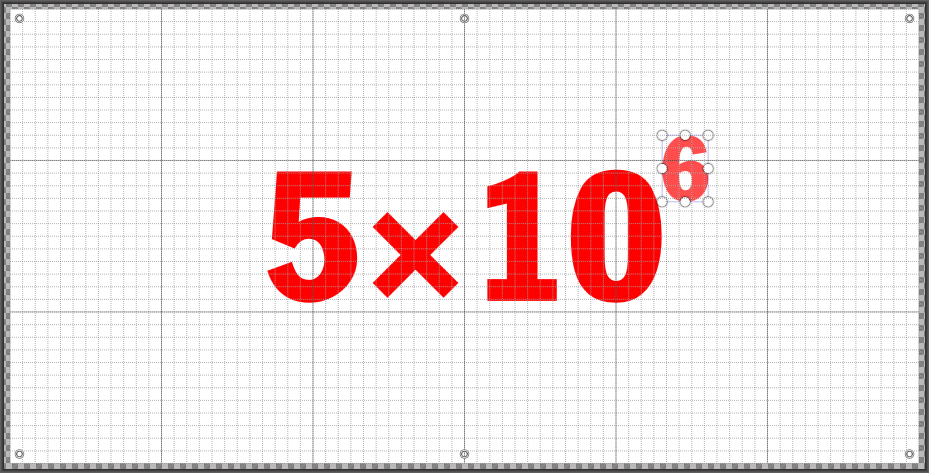
To use the "6" as our exponent we will have to make it smaller, and the ODT has several ways we can do this:
- Change the font's size value (e.g. from 60 to 30).
- Use "Scale Down".
- Click-&-drag one of the selection box's corner handles.
In this example, we'll reduce the size of the font to 30, and then move it into position (turning on the overlay grid helps make repositioning it easier):
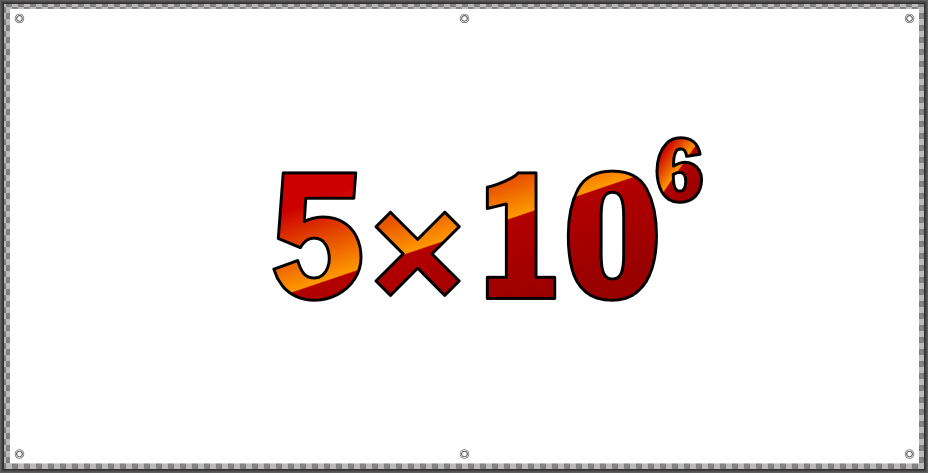
As it's unlikely that most designs would simply leave both text objects where they are in the design, we'll cover how to combine the two objects into a Group. Once they have been grouped, they can be manipulated as a single text object (colors, outlines, scaling, etc.), including any method used to move an object to a different area in the design. A note on using a Linear Gradient with grouped text objects: Because a Group is only similar to a single object, and not truly a single object, the linear gradient will be applied separately to each object in the group. So it may be necessary to ungroup the objects while applying the gradient, and some experimentation may be required to get the same appearance. Continuing with the example, the following image shows what we get if we apply a linear gradient to the grouped objects when that gradient is set to an angle of 45°:
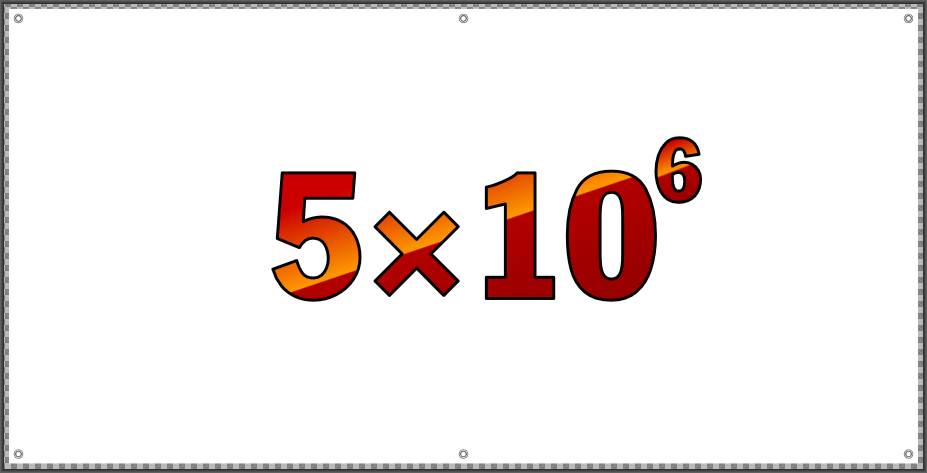
Using 5° steps, we can see that we get a much better appearance match by setting the "6" object's linear gradient angle to 75°. We can then regroup both objects and continue with building the design.
 |
ODT Spell Checker:
In the image at left, a red line is visible under the Spanish word hacen. The line shows that the text editor's spell checker has flagged the word as being misspelt.
When working with text for other languages the spell checker may flag a word as being incorrect when it isn't, as the spell checker is set to work with American English as its primary language.
|
|
If a non-English word is going to be used often users may it helpful to add that word to their eSigns.com account's dictionary. This may be accomplished by right-clicking on that word in the Text Editor and selecting Add to dictionary from the context menu.
|
|
We recommend being extra careful to check any foreign (non-English) language text being added to your design to ensure that it is correct before placing your order.
Adding Accent Marks in the ODT:
At times a design may require using an ODT font that does not include the desired accented characters and which is not installed on or available to the computer being used to create the ODT design. Should this happen, it needn't prevent creating a design as desired, and indeed there is a way around this in the ODT. The method which follows appears to be more complex, but is actually quite easy. It is a variation on that described above to add the the unsupported superscript "6" into 5×10?. For this method, the unaccented text is entered into the ODT normally, and the accent marks are created using characters which are present in the selected font. A video clip of this example is available to view at the end of this section.
|
To demonstrate, we'll use this Spanish text: «Escúchenlos. Niños de la noche. Qué música hacen.». We'll also assume that the accented characters and angled quotation marks are lost when the text is added to the design, giving us Escchenlos. Nios de la noche. Qu msica hacen.. First, we have to replace the missing letters. After doing so, we get what is shown at right.
|
|
Next, we use the Add Text button to apply the edit to the text in the design. With the text in the design we'll save the work done so far to avoid any potential problems that could arise if the design tool is allowed to time out. (We recommend saving your work every 5–10 minutes.) For best results, we also recommend getting the text set into the design as close to its final appearance as possible to help make creating the actual accent marks and special characters easier. For example:

To add the acute accent for the three letters in the line that should have it, the steps are:
- Left-click the line of text to select it
- Use the Copy button to create a copy of the selected line of text. It will help with the rest of this process to move the copied text to a different area in the design now. The arrow keys on the keyboard or the mouse may be used to move the copied line of text. Using this method helps ensure that the marks and special characters being created retain the settings used for the actual text—font, size, color, et cetera.
- Double-click the text object that was just moved to open the copied line in the Text Editor.
- In the editor, select the entire line of text so that it is highlighted. In this example, the highlighted text will appear in white against a blue background:

- Once the line of text has been highlighted, press the "Backquote" key on your keyboard (sometimes called the Grave Accent key), which is located at the top-left corner of the keyboard for most Windows-based computers. This will replace the copied line of text with a stand-alone Grave Accent mark: `

- We now have the original line of text and one grave accent mark in my example design. Please note that certain fonts may not include the grave accent [`] mark, so you may have to use an apostrophe, comma, or a "line" image from the clip art instead. While the grave accent mark is selected this a good time to change it so that it faces the proper direction, using the side-to-side Flip button.
- Because we need a total of three [3] acute accent marks in this design, we first ensure the mark is selected—a selected design element will be surrounded by the selection box small white dots (those dots being the design tool's click-&-drag handles) which may be used to resize an element freehand; then we click the Copy button twice, giving us three copies of the acute accent mark that are ready to be moved into position, especially if using the mouse.
- The next step needed for these acute marks is to move them into position over the letters which require them. Moving a small object can be difficult when the selection box and click-&-drag handles are showing, but there is an easy way to avoid that difficulty: Click somewhere else in the design to deselect that object, and left-click and hold down the mouse button; we will then be able to move the object without the selection box or click-&-drag handles getting in the way.
- Once the Grave accents have been added, the process would be repeated once to add the Tilde over the second "N" in Niños.
- To make the Spanish quotation marks (<< and >>) we'll essentially repeat Steps 1-6 above, but with the Less Than symbol (for the left quote) entered twice, instead of the Grave accent or Tilde. In Windows, the Less Than symbol is entered using the key combination of SHIFT+< as shown below. The pair of Less Than symbols will be our opening Spanish quotes. While there are a couple of ways to make the closing Spanish quotation marks the method we recommend is to use the Copy button to make a copy of the opening quote just created; then use the side-to-side Flip button to mirror the copied marks and make them point to the right.

- Once all the accent marks have been created and moved into position we recommend selecting the text and the accent marks, and then using the Group button to make the selected objects a Group. When grouped the objects can be manipulated as if they were a single object. This will make things like changing the color of the text and the accents, or moving the text and objects much easier to do.
? Watch the Accents & Special Characters demonstration video by clicking the link below:
Accent marks and special characters that are not part of a given font may be entered in a design through creative use of punctuation and clip art. Please note that the characters available may vary by font. A list of special characters and ways to create them appears in the table below.
| Special Character | Design Tool Trick |
|
Acute:
 |
Backquote/Grave accent key; if not included in font an apostrophe or comma may be used. Make Copy of text to retain font settings, select all text in copy and replace with stand-alone Grave accent mark; <–> Mirror, move into position. |
|
Circumflex:
 |
Shift+6 key; if not included in font a rotated Less Than [<] or Greater [>] than symbol may be used. Make Copy of text to retain font settings, select all text in copy and replace with stand-alone Circumflex accent mark; move into position. |
|
Grave:
 |
Backquote/Grave accent key; if not included in font an apostrophe or comma may be used. Make Copy of text to retain font settings, select all text in copy and replace with stand-alone Grave accent mark; move into position. |
Tilde:
 |
Shift + Grave Accent key. Make Copy of text to retain font settings, select all text in copy and replace with stand-alone Tilde; move into position. |
Umlaut:
 |
Shift + Semi-Colon key. Make Copy of text to retain font settings, select all text in copy and replace with stand-alone Colon; Rotate so it is horizontal, move into position. |
|
Inverted Exclamation:
 |
Shift + 1 key. Make Copy of text to retain font settings, select all text in copy and replace with stand-alone Exclamation Point; Mirror Vertically so it is upside-down, move into position. Please Note that when this is added that about half of the mark should extend below the bottom (baseline) of the text. |
|
Inverted Question:
 |
Shift + / key. Make Copy of text to retain font settings, select all text in copy and replace with stand-alone Question mark; Mirror Vertically so it is upside-down, then Mirror Horizontally so that it 'faces' right, move into position. Please Note that when this is added that about half of the mark should extend below the bottom (baseline) of the text. |
|
Fraction:
 |
Fractions are one of the more complex elements to create, but are still fairly easy to enter in an online design. Fractions can be built using a total of three pieces, which are the numerator [n], the forward slash [/], and the denominator [d]. To help keep the fraction from being too much taller than the rest of the text around it, I recommend using the -Size button to reduce the size of the n and d numbers somewhat before moving them into position. |
Customer Service personnel are available during our service & support hours (all times Eastern):
Don't see what you're looking for? Try one of the categories below:
Browse by Category
Featured Products
ORDER YOUR SIGNS & BANNERS NOW


More Knowledge Base Articles
Banners
- Vinyl Banner Comparison Chart
- The Ultimate Vinyl Banner Installation Guide
- Importance of Properly Making Vinyl Banners
- Tips Cleaning Vinyl Signage
- Preserving Vinyl Banners
Banner Stands
- How to Set-up Jumbo Backdrop Stands
- How to Set-up Double Step Retractable Banners
- How to Set-up Economy Retractable Banners
- How to Set-up L Stand Banners
FAQs
- Genera FAQs
- RGB VS CMYK Color Models
- Color Wheel and Converter Tool
- Vinyl Banners FAQs
- Yard Sign FAQs
Yard Signs
Customer Service personnel are available during our service & support hours (all times Eastern):
You're welcome to contact us by Telephone (1-800-494-5850), Email (cs@esigns.com), Live Chat (using the button located in the top-right on eSigns.com), or Support Ticket.